How To change or update Windows 10 / 8 / 7 OEM logo
Simple tutorial how to change or update windows 10 / 8 or 7 OEM logo, OEM logos included in download.
Here is simple tutorial how to change, insert, update or remove Windows 10/8/7 OEM logo in "My Computer" or Windows 10 it is "This PC".
There is several ways to change OEM logo and information, you can update windows registry etc. but for me seems bit to much and I prefer to use OEM Configurator V2. this program works with all versions of Windows and you don't need any additional updates to use it.
Generally this info is all there when You buy new PC or Laptop but you may want to remove or update some information so here is easiest way to do so.
How to change / update / remove Windows 10 OEM logo.
First this go and download OEM Configurator V2 and OEM logos from here: DOWNLOAD
All downloads are safe, there's no malicious software included, all you have in this folder is OEM Configurator V2 and OEM logos.
Open OEM Cofigurator V2.exe and run it, you should get something like this: 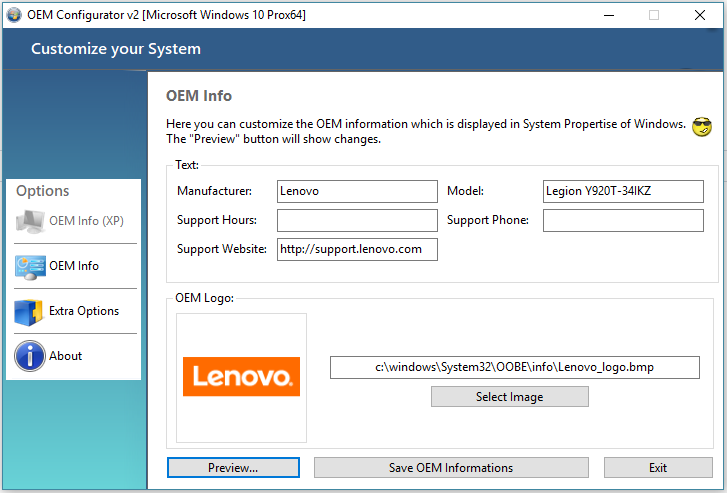
In my case all information is filled in but if you want to display no info then just leave all entries blank.
To update OEM logo, choose one form the folder you download from here and move it to your Windows folder, now just press select "Select Image" and navigate to your Windows folder and choose your LOGO.bmp and then click "Save OEM informations".
Also you can use custom images as Your OEM logo just one thing to remember that your custom OEM Logo will have to be ".bmp" format and 120 x 120 size.
You cant do any harm to your device by using this software so feel free to try out different setting and just mess around until you happy with information you have entered.
See video here: How to change / update / remove OEM logo and information in Windows 10